Monday, December 1, 2014
Francophone readers and commenters welcome
I've noticed that a fair number of blog guests are from the Francophone world, mostly France. While I can't say that I'm an absolute master of the language (to say the least!), I d speak it fairly well and welcome any feedback or questions in the language. Ce serait avec plaisir, mais veuillez m'excuser si mon ecriture est plein de fautes grammatiques.
Check out my tutorials on Youtube
I've only got some rudimentary stuff up so far, but I do have a channel on Youtube where I post 5010 minute tutorials on various parts of our project. So far, it's stuff that's covered pretty well already on other sites, but I have some fresh ones coming up soon that are more specific to the project and won't necessarily be found elsewhere, at least in the way that integrates Arduino with other things. Upcoming videos include: using MOSFET's to save power, hacking into the Sparkfun Vernier shield, and making a simple voltage regulator/charge controller for solar recharging of system batteries.
Wednesday, November 26, 2014
jeff's in town

In other news, I went to Walter Wood Hardware to pick up supplies for our first couple of buoys.
Happy Thanksgiving!
Wednesday, November 12, 2014
hangout with brian
Some of the crew did a video conference with Brian Huang of Sparkfun about using sleep functions to reduce power consumption in our projects. As usual, no matter the topic, Brian was on top of it. The kids took down his suggestions. He also gave some ideas on how to get the data coming over the Ethernet shield at the North Chickamauga site to graph, rather than just print some numbers on a blank IP address screen.
The key right now is to bypass the initialization "Press D12" part of the Vernier shield so that the probes take readings automatically once power has been restored to the shield following the sleep period (which would be most of the day). If we're going to try to get by with using only a 20 ah battery in the buoy and come only once a month to check in for data harvesting and power check, we need to squeeze every milliamp we can.

The key right now is to bypass the initialization "Press D12" part of the Vernier shield so that the probes take readings automatically once power has been restored to the shield following the sleep period (which would be most of the day). If we're going to try to get by with using only a 20 ah battery in the buoy and come only once a month to check in for data harvesting and power check, we need to squeeze every milliamp we can.

Sunday, November 9, 2014
charge controller still doing well
I've had the N3904 transistor in place of the BC548 and it seems to be fine. I think we're about ready to box one of these into a monitoring station.
Friday, November 7, 2014
charge controller tests out well so far
We've been testing a 6v charge controller schematic with a small 10w solar panel that students of mine built last year and a small 3 amp hour battery with an arduino attached as a dummy load.
 Here's the breadboarded circuit with battery.
 And here's the schematic:

Thanks of course to electroschematics.com.
The LM 317 is a standard adjustable voltage regulator. Output is regulated with the variable resistor. Most lead-acid 6v batteries have 6.8 v as a cutoff voltage. The reverse-biased zener diode 2D starts conducting when load reaches float charge and sends excess voltage to ground.
We've heat sunk the LM 317. A 1W rated resistor for R3 is too low. It gets way too hot for this application. We substituted a a ceramic 10W rated resistor and it stays cool. We'll give it a few more days, and if performance still checks out, we'll solder a permanent circuit. Some of our remote monitoring sites get at least mottled sunlight for a few milliamps each day.
Saturday, October 25, 2014
circuit add-ons working well so far
We're experimenting with the FET switching and charge controller circuits that we mentioned in an earlier post. So far, so good.
The FET switch, being pretty simple, does exactly what we thought it would do: shut the "load" shields down. Here's a link to the the particular setup we're using.
The charge controller we've only used for a couple of days. I want to see how it holds up for at least a week before we commit to field use.

Sunday, October 12, 2014
show at the creative discovery museaum
Several youngsters took time from their fall break to put on a demo/educational booth at the Creative Discovery museum. They set up several stations showing kids some core programming structures. We set up an air sensor (methane- which isn't going to report much) to an xbee so kids could walk around while the radio sent data back to a laptop. Fun evening.


Saturday, October 11, 2014
Core structure: Using FET's to Control Power
As I mentioned in an earlier post, we're going to work in FET's (mostly MOSFET's) to do some important stuff, notably to conserve power in remote locations and to regulate voltage.
For the former, a MOSFET can be used as a switch. Below is a simple example I'll show the kids next wee: a motor powered by a separate power supply that is shut on an off by sending highs and low from an Arduino digital out pine to the gate of the MOSFET. Signal high, MOSFET switches motor on. Signal low, motor is off.

For the former, a MOSFET can be used as a switch. Below is a simple example I'll show the kids next wee: a motor powered by a separate power supply that is shut on an off by sending highs and low from an Arduino digital out pine to the gate of the MOSFET. Signal high, MOSFET switches motor on. Signal low, motor is off.
·
The diode running parallel with the motor is
sometimes called a flyback or kickback diode.
When current is shut off in a device that has a coil, like a motor or a
relay, some of it will run backwards, which can possibly blow the MOSFET. The diode routs that backwards current back
to the motor, protecting the MOSFET.
·
The 10k resistor we see often in Arduino sketches. It functions a pulldown
resistor. It keeps the gate voltage at 0
if the Arduino output is low. This
avoids what is called a floating pin
situation. We don’t want any stray voltage to the gate except when we signal it
to be there with the digital out.
a And here's the generic code, setting the motor to go on and off at 5 second intervals.
int motor=3;
void setup ()
{
pinMode (motor,
OUTPUT);
}
void loop ()
{
digitalWrite (motor,
HIGH);
delay (5000);
digitalWrite (motor,
LOW);
delay (5000);
}
If things work out, we can shut off the Vernier shield at much longer intervals, saving valuable milliamps along the way.
Wednesday, October 8, 2014
burning in the mq 131
This ozone sensor takes a 48 hour burn in time. I'm going to use the local air quality station to calibrate a value, courtesy of the AirNow site, which give you your local Air Quality Index, PM count, and ozone count in real time.

Saturday, October 4, 2014
the "Wireless" part of our program getting started
One of our team members Zack got an Arduino Ethernet Shield going- just a bit of data going to an IP address- in this case, an air sensor that we were playing with . One small step......
How to keep the power going on our remote stations
Certainly a problem. You have some choices: include a bigger battery, change out the battery more often, reduce power consumption, and provide extra power. We've been tinkering with solar, since that's where I have a bit of background. Starting to look at a mini turbine as well. Of course, on the supply end, there's going to be the need for charge controllers/voltage regulators. We just ordered some components to try building a few circuit designs. There's commercial stuff out there, but might as well give a crack at making our own.
There's also using a switching function to shut the vernier shields on and off, which would also reduce power consumption. I've just gone through a skyping with the Hixson kids on how to measure power consumption of different loads and to get a rough estimate of total daily consumption. Bit of ohm's law there.
What the voltage regultion and switching functions both have in common is that they feature FET's (Field Effect Transistors), which will give a good opportunity to bring in a bit of circuit fundamentals. Don't know if I want to make it a recorded tutorial, skype it, or both. It's now on my list, though.
Kids will have a booth at Startup Week
We're on to show off what we're doing at Chattanooga Startup Week at the Creative Discovery Museum. They came up with a plan where folks can graduate through several stations of increasing complexity through different programming structures. We'll also try to get a weather balloon in the air with some of our calibrated sensors. We've just found an ozone sensor (read the datasheet! that we look forward to using.
Here's a time lapse video of three of our youngsters trying to assemble it all while figuring out exactly how the stations will work, including a bit of venting of frustration. Good job, kids.
Monday, September 22, 2014
air sensors coming along
I've got a team focusing on air sensors. So far, we've focused on the MQ series. You get what you pay for, so these are the most reliable devices. They operate with a heated element to produce a redox voltage, much like an oxygen sensor in your car does.

Pictured above is a very amateurish attempt at calibrating an MQ-2 methane sensor. The natural gas in the chemistry lab, like most commercial gas, is about 96 percent pure, so in theory, a saturation of it would be 960,000 ppm. Don't laugh, I know that's not what's happening here. We're trying to teach theory, not reality, on this one. We pumped a line from a gas valve into this cloche and looked for a max value on the analog to digital read. In this case, it maxed at about 970. The low that we get for this sensor is 54. The data sheet for the mq sensors has them calibrated on a logarithmic scale. We got our constant this way:
960000=10k(970-54) or max val ppm= 10 k (max analog read-min analogread)
Log 960000 = k(916)
Log960000/916 = k = .006530864
so the final formula that converts the analog read to ppm is based on the formula:
Y= 10 ^ .006530864(x-54) x being the analog read value
The math in the Arduino sketch would go this way:
void loop() {
// read the analog in value:
// read the sensor:
int sensorReading = analogRead(A0);
float ppmValue = pow(10,(.006530864*(sensorReading-54)));
// print the sensor reading so you know its range
Serial.print("ppm methane = " );
Serial.println(ppmValue);
We can think of half a dozen reasons off the top of our heads to not trust whatever number is spewing out, but in theory, it gets the principle of calibrating and constants taught. If we're lucky, we might track down some really accurate monitoring devices for our pollutants that we can calibrate against to get our own readings somewhere in the ballpark.
Friday, September 12, 2014
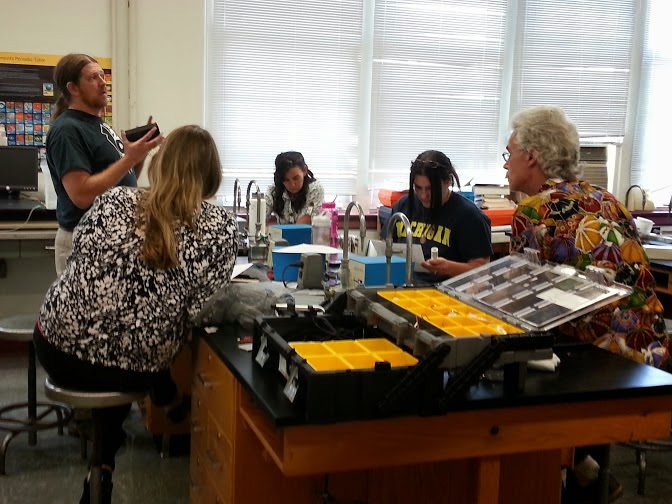
Finally out in the field
We went out in the field with Dr. Mark Schorr from the University of Tennessee at Chattanooga. Dr. Schorr has been sampling the North Chickamauga system for decades, and looks forward to getting data from our project.
We first went to an acid mine damage mitigation site, which has a four stage containment pond system: plastic lining and limestone:

You can see the "yellowboy", better known as precipitated/oxidized iron. Good time for a bit of brushup on pH, negative logs, and redox.
We had the xbee radios attached to our equipment available if needed to save time getting around to different sampling points. Didn't really need them, though it was nice to have them out...


 I threw some botany and geology while we were out there, which I always try to do on a field trip. The kids had a great time, and as one student remarked, "Now all this seems more real. I have a more thorough understanding of what we're trying to accomplish."
We first went to an acid mine damage mitigation site, which has a four stage containment pond system: plastic lining and limestone:
You can see the "yellowboy", better known as precipitated/oxidized iron. Good time for a bit of brushup on pH, negative logs, and redox.
We had the xbee radios attached to our equipment available if needed to save time getting around to different sampling points. Didn't really need them, though it was nice to have them out...
At our reference stream, we did some old-style colorimetric titrations for parameters like alkalinity and hardness.
After leaving the mitigation site, we went to our reference/baseline stream.
Got the first skyping in
Goal is every Thursday to have a tutorial and conference. Since my kids will be in other classes when the Hixson kids are available, we'll just rotate a pair of team ambassadors each time.

Prepping for the First Field Trip
Our team met early this week. Dr. Schorr from UTC was with us. We got down to the brass tacks of the field trip, but also the design challenges of getting buoys out in the streams that will work long term. Looking forward to seeing the prototypes that the kids at Hixson are coming up with.
Wednesday, September 3, 2014
Project groups are forming.
So far, it looks like this. Teams include:
Air Sensors
Water Sensors
Buoy Design
Wireless
Ethernet/webpage
Hardware, circuitry, and soldering
Air Sensors
Water Sensors
Buoy Design
Wireless
Ethernet/webpage
Hardware, circuitry, and soldering

Sunday, August 31, 2014
they're getting the toys working

LCD screen works
Success with if/else statements. A good way of getting kids an understanding of structures are for them to tweak them or drop them into another sketch altogether. Figuring out the code gets dropped in (initialization, void setup, void loop) is part of it.
I want the kids to get outside some this week and play with the xbees and sensors (they deserve it), but I also want them to get to where they instinctively know where to add the tweaks in simple stuff. I think I"m going to try a day where they figure out what to insert into an existing sketch and where to insert it. Scratch is a good program that allows beginners to click and drag code lines, and if we had more time together, I would have started my kids with it. I highly recommend it for teachers who have a good bit of time to play.
In an ideal schedule, I would also have:
- Troubleshoot day. Have a sketch shown with various mistakes. When the sketch won't upload, kids brainstorm how to fix the mistake and use the error bar at the bottom of the screen to help them troubleshoot. Kids could even write down their own list of common error messages and "dejargon" them.
- Sketch mashup. Goes a bit beyond the tweak. Take two seemingly unrelated sketches and mash them together.
- Sketch repurpose. Take a mundane demo sketch and repurpose it to something useful at home.
Thursday, August 28, 2014

Tuesday, August 26, 2014
if/then
Kids have been tinkering with if/then statements for a couple of sessions. First, the load a bare-bones sketch with a serial read where a potentiometer shuts on or off an output at a set threshold point. In this case, I had them use a hobby motor. Then, I told them to tweak the sketch by pulling out the motor and adding 20 LED's and let the threshold alternate which LED is on. From there, I had them apply similar logic to getting a temperature sensor control output.
I plan to do the same approach of apply structure, tweak, and tweak again to learning FOR statements. After that, let them build whatever with the structures they've learned. I
From there, it's time for phase 2: assign roles/teamsfor our WEW project and get them going.
I plan to do the same approach of apply structure, tweak, and tweak again to learning FOR statements. After that, let them build whatever with the structures they've learned. I
From there, it's time for phase 2: assign roles/teamsfor our WEW project and get them going.
Monday, August 25, 2014
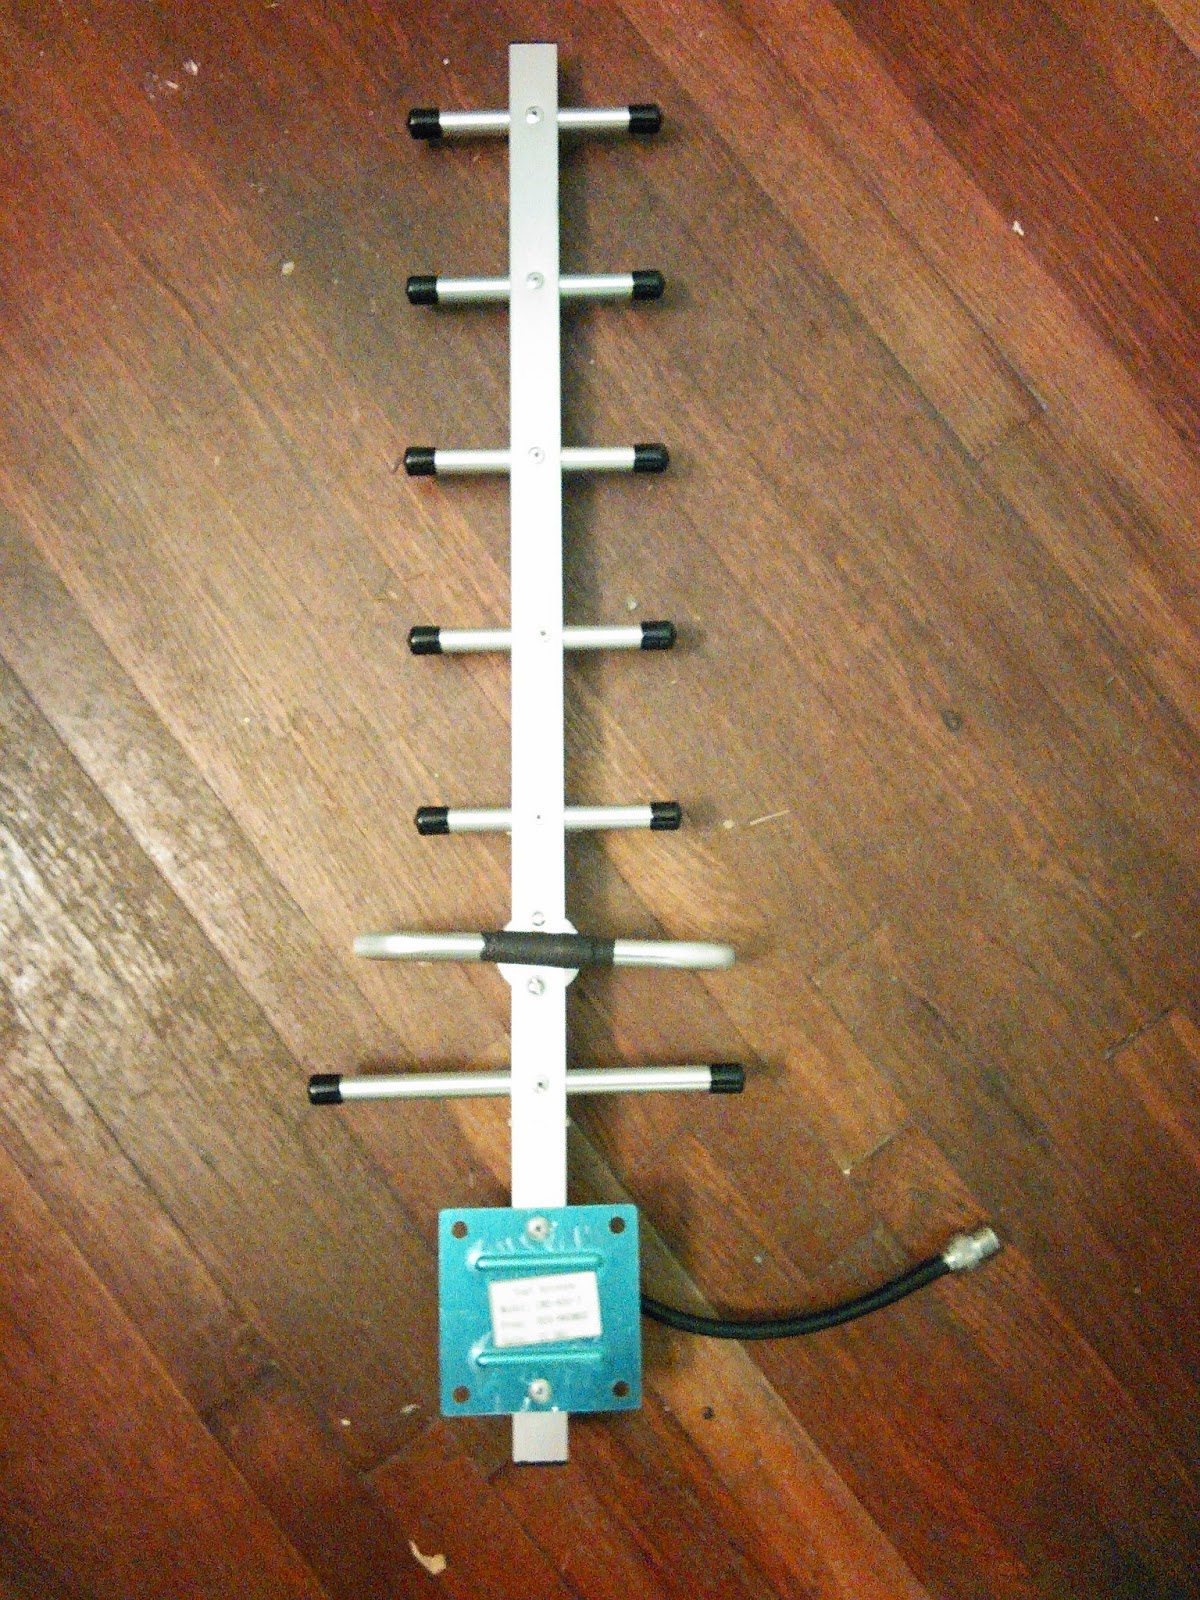
Yagi
Taking up a suggestion we got and will see if a couple of these Yagi antennas will provide any boost on our wireless end.
Sunday, August 24, 2014
Week 2 recap
We've just gotten through analog to digital and if/else statements. Mrs. Johnston reports that her kids are excited and thoroughly enjoying themselves. I'm hoping that we can get outside some this week and play around with the wireless some.
On Friday I gave kids a challenge to figure out how to use if/else to make a light come on or off based on a potentiometer value. Several kids got it, and so did our intrepid librarian, Mrs. Wells.
On introducing FOR loops, the best approach is to probably show how kids who have stacked lots of LED's in sequence can make their code a lot shorter and simpler with arrays.
The catch for us right now is time- how to make 35 minute sessions really work.
Some changes:
- For sketches that are meant to demonstrate a concept, have a copy printed out or uploaded onto something like Google Drive. Let them load up and then explain to them what is controlling what. Then they can start tweaking away on the sketch by changing code and hardware.
- Also during these purely instructional sessions, let them pair up on a screen and a kit. That means less troubleshooting of board pinouts, sketches that won't load, unrecognized ports, which means less wasted time.
- I'm letting students checkout a simplified kit with an Uno, small breadboard, and a few jumpers, leds, buttons, resistors.Not quite ready to let them check out the SIK kits yet.
Sunday, August 17, 2014
site 1 layout
Here's an overhead of North Chick flowing to the west of Hixson High and Hixson Middle. The nearest point that wireless can get to an ethernet connection is the middle school-about 950 feet or so. Ms. Johnston's kids will be seeing what a pair of Xbee pro 900's can do. There will probably have to be at least a third one in the signal chain. A couple of kids want to try their hand at Yagi antenna building....

Wednesday, August 13, 2014
Tuesday, August 12, 2014
Got it started
Just met my group for the first time. Most of the kids I've had before. Our Librarian Mrs. Wells had everything laid out (laptops, Sparkfun Inventor's Kits, a projector and screen). I ran through my intro presentation. Here's the powerpoint I showed them that outlines the project and the rest of the semester. We got the kits assembled. Tomorrow will be all about blinking lights, digitalOut, and timing.
Sunday, August 10, 2014
getting visual
Some things just need a picture. This weekend I'm figuring out how to best explain stuff like analog, digital, input, output, etc. Throwing up on LoggerPro the ebb and flow of the HIGH's and LOW's (set at a very slow, viewable rate) seems like a good idea.

Friday, August 8, 2014
our first stream/ what a good day of professional development looks like
Professional Development before school starts is usually a short saison en enfer, but not this year. Our team got to wander around a creek, play with wireless communication, and actually come up with useful, concrete ideas that didn't go in a 3 ring binder.
Right behind Hixson High is North Chickamauga Creek. Here is the sampling spot. At the this point in the stream, the flow is through Devonian limestone. The greenish tint of the water along with lots of cedar and walnut trees nearby are good indicators of the "sweet" soil. However, on Walden's Ridge, where NCC begins, we'll be dealing with very acidic water from coal mining damage, pyritic rock and shales that provide little buffering capacity.

This will be where we do our design tests for the buoy design and wireless capability. Lots of things for the kids at Hixson to iron out.
After doing the field work, everyone went to the library where we discussed how to work out the live tutorial streams between schools. Andrew, a young engineer I've been bouncing ideas with, happened to be there. We commandeered him to join our meeting, and he gave us some good ideas on getting our data up to the Cloud.

Right behind Hixson High is North Chickamauga Creek. Here is the sampling spot. At the this point in the stream, the flow is through Devonian limestone. The greenish tint of the water along with lots of cedar and walnut trees nearby are good indicators of the "sweet" soil. However, on Walden's Ridge, where NCC begins, we'll be dealing with very acidic water from coal mining damage, pyritic rock and shales that provide little buffering capacity.
This will be where we do our design tests for the buoy design and wireless capability. Lots of things for the kids at Hixson to iron out.
After doing the field work, everyone went to the library where we discussed how to work out the live tutorial streams between schools. Andrew, a young engineer I've been bouncing ideas with, happened to be there. We commandeered him to join our meeting, and he gave us some good ideas on getting our data up to the Cloud.
Recruitment
Showing a bit of the project in action helps round up interest. Just got through showing a pair of xbee's to some kids in homeroom. I let one of them walk out the halls with an xbee attached to a laptop via a Sparkfun dongle. She enjoyed typing creative insults at a distance, though with a physics or math bent: "Your field lines are sooooo weak."
Sunday, August 3, 2014
Opportunities for Depth
Time's going to be tight. My time with the youngsters is going to be 35 minutes three days a week. There's no grade, no credits, no tests. Just do it. Not a lot of room for fat.
That said, I'm thinking of a few spots where we can get into some depth
Analog to digital. Nature is analog, our rendering of it digital. We start hammering this pretty early, sticking potentiometers, thermistors, photoresisters, and the like for a variable signal into the Analog In ports of the Arduino to get a serial read. Taking whatever phenomena/event from the outside world that you're focusing on and getting a measurable output for data or to control commands is a whole lot of, well, everything in the electronic and scientific world. This has gotten me thinking about using the venerable 555 timer IC, the original "hobby board", and the most used integrated circuit in history. 8 pins, simple setup, less than a buck apiece, and like Arduino has been spun into countless projects.
Run in "astable" mode, it's programmable by setting values the two resistors and a capacitor.
The resistors and cap chaining to ground makes, of course an RC setting, setting the pulse of the output to whatever frequency. If all values are fixed, then the pulse is fixed, and that pulse can be sound, light, or whatever. But set a variable resistance between pin 7 and vcc and the output will vary accordingly. And that resistance can be a function of whatever you are measuring.
Lots of concepts packed into half a dozen components, easy to build, and with plenty of room for exploration. It is a good building block for learning microcontrollers and gets you down to more fundamental concepts that otherwise get hidden in the do-all quality of Arduino.
Counting and Calibrating. Whether we're testing water or air quality, we're turning environmental behavior into a voltage, and either counting those voltages as pulses, or turning them into a value (conductivity, pH, ppm). I might dig up an old circuit that like the 555 timer, is 1970's level technology, complete with a couple of obsolete chips.
There's a couple of science teacher's supply outlets that still offer a version of this: the anaerobic respiration bubble counter. The yeast respirates carbon dioxide as it ferments. Experiment with temperature, sugar type, etc. and compare data sets.
The setup is a photogate that goes high when a bubble passes by. Old 4026 CMOS drivers advance the count of the 7 segment number displays. I could demo it as is, then unplug the sensor and put it to the Arduino, moving from old school to new school. Maybe we could add a gas pressure sensor in the mix and see if the kids could mentally dust off their gas laws from chemistry class and estimate an average volume or particles per bubble, adding dimension to a dimensionless value. We'll see on that one.
Saturday, August 2, 2014
Fritzing
We'll be using the popular free circuit building program Fritzing for a lot of our tutorials. A lot of online electronics/microcontroller tutorials use it. That way I can build a circuit on screen as I talk. I'm going to encourage the kids to load it on their devices and use it themselves in and out of class. It will be very helpful if a team needs to bounce ideas back and forth. The great thing is that beyond the wires, capacitors, and well known IC's, they have icons for different microcontrollers. Here's an example:

Find People Smarter Than You
Been up at the school today trying to plan and get the room ready for the the youngsters. At noon, I shot over to the Chattanooga Public Library's 4th Floor to check out the Maker Party. I enjoyed sitting down and learning a few things about TinkerCAD, which is used to design stuff for 3-D printers. I think it might be a good program for the kids in my Energy Systems class to do some project designs, particularly some that will have some overlap with our Wireless Earth Watchdogs.
I had a pocket flip pad and pen to kiss butt and take names, particularly those who might be interested in dropping by the WEW and helping the kids with a particular skill. I had some skills in mind, and found a couple of prospects.
It's good to Find People Smarter Than You and get them to lend a helping hand. For example, We're thinking about using an Ethernet Shield to get some of our data online in real time.

I looked at some of the code for a sample chat program:
Chat Server
A simple server that distributes any incoming messages to all
connected clients. To use telnet to your device's IP address and type.
You can see the client's input in the serial monitor as well.
Using an Arduino Wiznet Ethernet shield.
Circuit:
* Ethernet shield attached to pins 10, 11, 12, 13
* Analog inputs attached to pins A0 through A5 (optional)
created 18 Dec 2009
by David A. Mellis
modified 9 Apr 2012
by Tom Igoe
*/
#include <SPI.h>
#include <Ethernet.h>
// Enter a MAC address and IP address for your controller below.
// The IP address will be dependent on your local network.
// gateway and subnet are optional:
byte mac[] = {
0xDE, 0xAD, 0xBE, 0xEF, 0xFE, 0xED };
IPAddress ip(192,168,1, 177);
IPAddress gateway(192,168,1, 1);
IPAddress subnet(255, 255, 0, 0);
Well, I don't know rip about the stuff with IP addresses. I research further and find that the communication is often done by a Telnet, which is pretty much the Internet circa 1970. This got me thinking that maybe this is an opportunity to get a little tech history in, and some deeper concepts about how the internet works at a core level, with the addresses asking for permission to send and receive and all that. Nothing big, just a brief "pop up" while we're going over this part of the project. I pitched this mouthful to some folks and I got a contact for someone who might be good for this skill/concept.
Don't be afraid to network.
I had a pocket flip pad and pen to kiss butt and take names, particularly those who might be interested in dropping by the WEW and helping the kids with a particular skill. I had some skills in mind, and found a couple of prospects.
It's good to Find People Smarter Than You and get them to lend a helping hand. For example, We're thinking about using an Ethernet Shield to get some of our data online in real time.
I looked at some of the code for a sample chat program:
Chat Server
A simple server that distributes any incoming messages to all
connected clients. To use telnet to your device's IP address and type.
You can see the client's input in the serial monitor as well.
Using an Arduino Wiznet Ethernet shield.
Circuit:
* Ethernet shield attached to pins 10, 11, 12, 13
* Analog inputs attached to pins A0 through A5 (optional)
created 18 Dec 2009
by David A. Mellis
modified 9 Apr 2012
by Tom Igoe
*/
#include <SPI.h>
#include <Ethernet.h>
// Enter a MAC address and IP address for your controller below.
// The IP address will be dependent on your local network.
// gateway and subnet are optional:
byte mac[] = {
0xDE, 0xAD, 0xBE, 0xEF, 0xFE, 0xED };
IPAddress ip(192,168,1, 177);
IPAddress gateway(192,168,1, 1);
IPAddress subnet(255, 255, 0, 0);
Well, I don't know rip about the stuff with IP addresses. I research further and find that the communication is often done by a Telnet, which is pretty much the Internet circa 1970. This got me thinking that maybe this is an opportunity to get a little tech history in, and some deeper concepts about how the internet works at a core level, with the addresses asking for permission to send and receive and all that. Nothing big, just a brief "pop up" while we're going over this part of the project. I pitched this mouthful to some folks and I got a contact for someone who might be good for this skill/concept.
Don't be afraid to network.
Thursday, July 31, 2014
Shameless plug
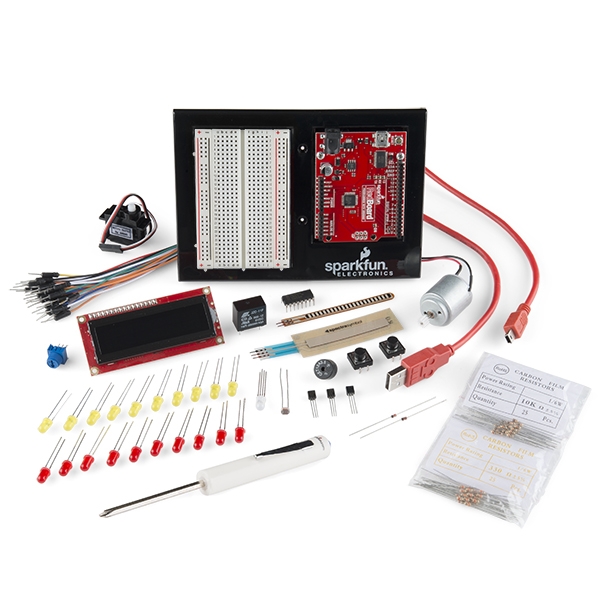
We're going to use theSparkfun Inventor's Kit for our Project. This summer I trained with Brian Huang at Sparkfun's HQ in Boulder, and can say that after spending a week there using it, and a good chunk of the summer prototyping some of the our project's core ideas on it, it is the way to go.. The kit has it all:
In water, those parameters will include temperature, ph, and conductivity. In air, carbon monoxide, carbon dioxide, and ozone. We hope to get other parameters in our project as we progress.
For example, a CO2 sensor will return a dimensionless value somewhere between 0 and 5 volts. It will be up to the kids to turn it into a usable value that prints out, such as parts per million (ppm).
At the Sparkfun training, one veteran teacher and I were discussing my project, and he said, when you start having to calibrate, or in other words, find your "k" (constant), you're on the road to real science.
I'm not a math guy. Wish me luck.
- an arduino
- a breadboard
- cable
- a very good guide
- an LCD screen
- lots of components to get through the core concepts of Arduino, like analog to digital, serial read, digital to digital: LED's, resistors, pushbuttons, and a series of sensors that offer opportunities for students to understand how to convert the analog world of what's around them to a set value
In water, those parameters will include temperature, ph, and conductivity. In air, carbon monoxide, carbon dioxide, and ozone. We hope to get other parameters in our project as we progress.
For example, a CO2 sensor will return a dimensionless value somewhere between 0 and 5 volts. It will be up to the kids to turn it into a usable value that prints out, such as parts per million (ppm).
At the Sparkfun training, one veteran teacher and I were discussing my project, and he said, when you start having to calibrate, or in other words, find your "k" (constant), you're on the road to real science.
I'm not a math guy. Wish me luck.
Tuesday, July 29, 2014
So what is Arduino?

From Wikipedia:
Arduino is a single-board microcontroller, intended to make the application of interactive objects or environments more accessible.[1] The hardware consists of an open-source hardware board designed around an 8-bit Atmel AVRmicrocontroller, or a 32-bit Atmel ARM. Current models feature a USB interface, 6 analog input pins, as well as 14 digital I/O pins which allows the user to attach various extension boards.
Introduced in 2005, the Arduino platform was designed to provide an inexpensive and easy way for hobbyists, students and professionals to create devices that interact with their environment using sensors and actuators. Common examples for beginner hobbyists include simple robots, thermostats and motion detectors. It comes with a simple integrated development environment (IDE) that runs on regular personal computers and allows users to write programs for Arduino using C or C++.
The current prices of Arduino boards run around €20, or $27 and those of related "clones" as low as $9. Arduino boards can be purchased pre-assembled or as do-it-yourself kits. Hardware design information is available for those who would like to assemble an Arduino by hand. It was estimated in mid-2011 that over 300,000 official Arduinos had been commercially produced, and in 2013 that 700,000 official boards were in users' hands.
Don't run away if the description there scares you, as it would me until recently. Full disclosure: I had hardly touched a computer until I was 27, and didn't know rip about chips, programming, and the like. If I can get into this stuff, you can. Arduino was suggested to my by a friend's son as the hot new thing for people who want to really DO stuff with technology but were total amateurs. You can find Arduino at Radio Shack for pretty cheap, and a whole host of add-ons through many suppliers. I tend to use Sparkfun, which is very oriented towards teachers and has designed a host of classroom-friendly stuff.
Arduino is an open source platform with tons of free tutorials, sample programs, how to's, and one of the fastest online forum response turnovers you'll ever see. Check out their site.
core setup
As we get ready for the arrival of the kids next Thursday, I'm wanting to make sure that I've got some of the core project parts more or less running. Here's a little video showing most of our basic work in a raw nutshell: Two Arduino Uno's communicating wirelessly with XBee Pro 900's. Both have Arduino Wireless SD Shields, and the one on the left has Sparkfun's new Vernier Interface Shield with a pH and temperature probe attached. It is sending data to the other Arduino.
I'm pretty much a newbie to programming, so fellow newbies to microcontrollers and programming in general, I'll try to touch on some of the challenges. We're going to have some tutorials posted here, mostly ones that are specific to our project. There are a ton of tutorials out there that teach basic Arduino concepts already, so I'll provide links to those from time to time.
Greetings. Teachers, students, or just curious folk, I hope that you will enjoy our students progress as the kids of Chattanooga School of the Arts and Sciences and Hixson High become the Wireless Earth Watchdogs, dedicated towards using microcontrollers and wireless systems to monitor the environmental health of the greater Chattanooga area. We're using the Arduino platform to build remote water and air quality monitoring equipment that can last long-term in the field. This blog will focus on techniques, design, and refining our work.
Subscribe to:
Posts (Atom)